工作模式概述
简单模式
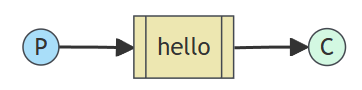
简单模式中只存在一个生产者,只存在一个消费者。生产者生产消息,消费者消费消息。消息只能被消费一次,也称为点对点模式。
简单模式适合在消息只能被单个消费者处理的场景下存在。
工作队列模式(Work Queue)
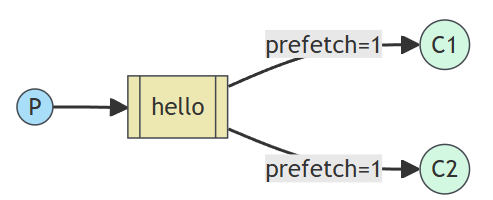
工作队列模式中存在一个消费者,多个生产者。生产者生产消息,消息队列将生产的消息分发给不同的消费者,每个消费者接收到不同的消息后开始进行消费。简单来说,工作模式下,消息不会被重复消费,不同的消费者消费的是不同的消息。
工作模式适合在集群环境中做异步处理。
发布订阅模式
交换机(Exchange)
作用:生产者将消息发送到Broker中,会先经过交换机,由交换机将消息按照一定规则路由到一个或者多个消息队列中(在简单模式和工作队列模式下,由生产者直接将消息投递到队列中,这种情况在RabbitMQ中根本不会出现)。
RabbitMQ交换机有四种类型:fanout、direct、topic、headers。不同类型有着不同的路由策略。AMQP协议其实是有六种交换机类型的(除了上述四种,还有system和自定义),只不过RabbitMQ只使用了其四种而已。
1. Fanout:广播,交换机将从生产者中获取的消息交给与之绑定的全部队列(对应工作模式中的发布订阅模式)。
2. Direct:定向,交换机将从生产者中获取的消息交给与之绑定的符合RoutingKey的队列(对应工作模式中的路由模式)。具体RoutingKey是啥,后面会讲到。
3. Topic:通配符,交换机将从生产者中获取的消息交给与之绑定的符合RoutingKey的队列(对应工作模式中的通配符模式)。定向和通配符中的RoutingKey是略有不同的,具体到工作模式的路由模式和通配符模式就会明白。
4. headers:此类交换器并不依赖于RoutingKey的匹配规则来路由消息,而是根据发送的消息内容中的headers属性进行匹配。headers类型的交换器性能会很差,而且也不实用,基本看不到它的存在,了解即可。
Exchange只负责转化消息,并不负责存储消息。因此如果没有任何交换机和队列绑定,或者发送的消息没有符合路由规则的队列,消息就会丢失。
RoutingKey,路由键。生产者发送消息给Broker时,指定的一个字符串,用来告诉交换机应该如何处理这个消息。
BindingKey,绑定键。在声明交换机和队列之后,使用一个BindingKey将交换机和队列绑定起来。这样,当生产者将消息发送给Broker之后,交换机接收到消息就能根据消息中的RoutingKey和BindingKey进行对比,从而知道将消息路由到某个或者某几个队列中了。
本质上,BindingKey属于RoutingKey的一种。换句话说,两者的作用并没有什么差别。不同的是,路由键是生产者向Broker发送消息时使用的,绑定键则是交换机和队列绑定时进行绑定,然后再交换机给队列发送消息时使用。当生产者将一个绑定了RoutingKey的消息发送给交换机之后,交换机根据存在的BindingKey来将消息路由给队列。
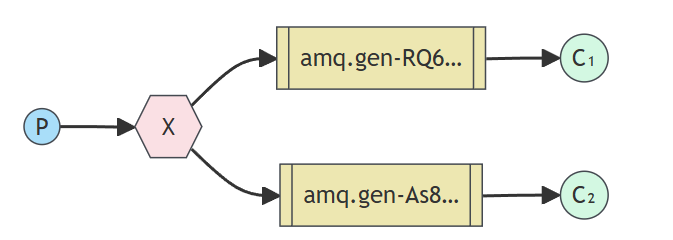
发布订阅模式存在一个生产者,多个消费者。生产者生产消息,交换机将消息复制多份,每个队列都会接收到相同的消息,每个消费者接收到消息之后开始进行消费。简单来说,消费者发送的消息,所有与之关联的队列都会收到相同的消息。
发布订阅模式适合消费需要被多个消费者同时接收的场景,例如实时播报或者广播消息。
路由模式
路由模式是发布订阅模式的变种,在发布订阅模式的基础上,增加了路由键。也就是说,消息到达交换机之后,不再是分发给所有关联的队列,而是根据绑定的路由规则来进行分发消息。
路由模式适合需要根据特定规则分发消息的场景。例如,系统日志打印,将不同级别的日志发送到不同的队列,最终输出到不同的文件。
通配符模式
通配符模式又是路由模式的变种,在路由模式的基础上,增加了通配符的功能,使消息分发更加灵活。
总的来说,发布订阅模式是消息到达交换机之后,交换机无条件的将所有消息转发给队列。路由模式是消息到达交换机之后,交换机根据RoutingKey的规则,将数据筛选之后分发给不同的队列。通配符模式也是消息到达交换机之后,交换机根据RoutingKey的规则,将数据筛选之后分发给不同的队列,只不过该RoutingKey不再是一个确定的路由键,而是类似于正则表达式的方式来定义路由键。
通配符模式适合需要灵活匹配和过滤消息的场景。
RPC模式

RPC模式没有生产者和消费者,比较类似于咋们的RPC远程调用,大概就是通过两个队列实现了一个可回调的过程。
1. 客户端发送消息到一个指定队列,并在消息属性中设置replyTo字段,这个字段指定了一个回调队列,用于接收服务器的响应,并且还设置了correctionId字段,用来确定响应是否为服务器所期望的。
2. 服务器接收到请求之后,处理请求并将响应消息发送到replyTo指定的回调队列中。
3. 客户端在回调队列上等待响应消息,一旦收到响应,客户端会检查消息的correctionId属性,以确定它是所期望的响应。
发布确认模式(Publisher Confirms)
发布确认模式是RabbitMQ提供的一种确保消息可靠发送到RabbitMQ服务器的机制。在这种模式下,生产者可以等待RabbitMQ服务器确认收到消息的通知,以确保消息已经被服务器所接收并进行了处理。
1. 生产者将channel设置为confirm模式(通过调用channel.confirmSelect(),发布的每一条消息都会获得一个唯一的ID,生产者可以将这些序列号与消息关联起来,以便跟踪消息的状态)。
2. 当消息被RabbitMQ接收并处理后,服务器会异步地向生产者发送一个确认(ACK)给生产者(内容包含了唯一ID),表示消息已经送达。
通过发布确认模式,生产者可以确保消息被RabbitMQ服务器接收并处理,从而避免了消息丢失的问题。
发布确认模式适合对数据安全性要求较高的场景,比如金融交易、订单处理。
SDK工作模式代码案例
简单模式
生产者代码
// 简单模式

public class Producer {

    public static void main(String[] args) throws IOException, TimeoutException {
        // TODO 创建连接工厂
        ConnectionFactory connectionFactory = new ConnectionFactory();
        connectionFactory.setHost("43.138.108.125"); // IP
        connectionFactory.setPort(5672); // PORT
        connectionFactory.setUsername("admin"); // 用户名
        connectionFactory.setPassword("admin"); // 密码
        connectionFactory.setVirtualHost("mq-sdk-test"); // 虚拟主机

        // TODO 创建连接
        Connection connection = connectionFactory.newConnection();

        // TODO 获取信道
        Channel channel = connection.createChannel();

        // TODO 声明队列
        channel.queueDeclare(Constants.SIMPLE_QUEUE, true, false, false, null);

        // TODO 声明交换机,使用内置交换机,无需声明

        // TODO 发送消息
        String msg = "hello simple";
        channel.basicPublish("", Constants.SIMPLE_QUEUE, null, msg.getBytes());
        System.out.println("简单模式生产者发送消息!");

        // TODO 关闭资源
        channel.close();
        connection.close();

    }

}
上述代码运行之后,在RabbitMQ的开源界面和IDEA终端上会有如下结果:


消费者代码
public class Consumer {

    public static void main(String[] args) throws IOException, TimeoutException {
        // TODO 创建连接工厂
        ConnectionFactory connectionFactory = new ConnectionFactory();
        connectionFactory.setHost("43.138.108.125"); // IP
        connectionFactory.setPort(5672); // PORT
        connectionFactory.setUsername("admin"); // 用户名
        connectionFactory.setPassword("admin"); // 密码
        connectionFactory.setVirtualHost("mq-sdk-test"); // 虚拟主机

        // TODO 创建连接
        Connection connection = connectionFactory.newConnection();

        // TODO 获取信道
        Channel channel = connection.createChannel();

        // TODO 声明队列
        channel.queueDeclare(Constants.SIMPLE_QUEUE, true, false, false, null);

        // TODO 声明交换机,使用内置交换机,无需声明

        // TODO 接收消息
        DefaultConsumer consumer = new DefaultConsumer(channel) {
            @Override
            public void handleDelivery(String consumerTag, Envelope envelope, AMQP.BasicProperties properties, byte[] body) throws IOException {
                System.out.println("成功接收到消息:" + new String(body));
            }
        };
        channel.basicConsume(Constants.SIMPLE_QUEUE, true, consumer);

        // TODO 关闭资源
        channel.close();
        connection.close();

    }

}
上述代码运行之后,队列中的消息被该消费者接收,控制台输出下述内容:

工作队列模式
由于在接下来的代码中,创建连接工厂,创建连接,开启信道,释放资源都要存在。因此为了简化开发,将这些步骤封装成方法,方便后续调用。
public class Common {

    private static Connection connection;
    private static Channel channel;

    // 获取信道
    public static Channel getChannel() throws IOException, TimeoutException {
        ConnectionFactory connectionFactory = new ConnectionFactory();
        connectionFactory.setHost("43.138.108.125"); // IP
        connectionFactory.setPort(5672); // PORT
        connectionFactory.setUsername("admin"); // 用户名
        connectionFactory.setPassword("admin"); // 密码
        connectionFactory.setVirtualHost("mq-sdk-test"); // 虚拟主机

        // TODO 创建连接
        connection = connectionFactory.newConnection();

        // TODO 获取信道
        channel = connection.createChannel();
        return channel;
    }

    // 释放资源
    public static void close() throws IOException, TimeoutException {
        channel.close();
        connection.close();
    }

}
生产者代码
public class Producer {

    public static void main(String[] args) throws IOException, TimeoutException {
        // TODO 获取信道
        Channel channel = Common.getChannel();

        // TODO 声明交换机,使用内置交换机,因此无需声明

        // TODO 声明队列
        channel.queueDeclare(Constants.WORK_QUEUE, true, false, false, null);

        // TODO 发送消息
        /**
         * 工作队列的模式是一个队列,多个消费者。
         * 当存在多个消息时,不同的消费者会接收不同的消息,消息并不会重复消费
         * 因此为了检验这个模式,发送多条消息
         */
        String msg = "hello work queue";
        for (int i = 0; i < 15; i++) {
            channel.basicPublish("", Constants.WORK_QUEUE, null, (msg + ":" + i).getBytes());
        }
        System.out.println("工作队列模式消息发送成功!");

        // TODO 释放资源
        Common.close();
    }

}
消费者代码
public class Consumer1 {

    public static void main(String[] args) throws IOException, TimeoutException, InterruptedException {
        // TODO 获取信道
        Channel channel = Common.getChannel();

        // TODO 声明交换机,使用内置交换机,因此无需声明

        // TODO 声明队列
        channel.queueDeclare(Constants.WORK_QUEUE, true, false, false, null);

        // TODO 接收消息
        DefaultConsumer consumer = new DefaultConsumer(channel) {
            @Override
            public void handleDelivery(String consumerTag, Envelope envelope, AMQP.BasicProperties properties, byte[] body) throws IOException {
                System.out.println("消费者1接收到的消息:" + new String(body));
            }
        };
        channel.basicConsume(Constants.WORK_QUEUE, true, consumer);

        // TODO 释放资源
//        Common.close();
    }

}
public class Consumer2 {
public static void main(String[] args) throws IOException, TimeoutException, InterruptedException {
// TODO 获取信道
Channel channel = Common.getChannel();
// TODO 声明交换机,使用内置交换机,因此无需声明
// TODO 声明队列
channel.queueDeclare(Constants.WORK_QUEUE, true, false, false, null);
// TODO 接收消息
DefaultConsumer consumer = new DefaultConsumer(channel) {
@Override
public void handleDelivery(String consumerTag, Envelope envelope, AMQP.BasicProperties properties, byte[] body) throws IOException {
System.out.println("消费者2接收到的消息:" + new String(body));
}
};
channel.basicConsume(Constants.WORK_QUEUE, true, consumer);
// TODO 释放资源
// Common.close();
}
}在上述代码中,不要释放资源。将生产者的代码重新启动一次之后,就会发现如下内容。从消费者消费消息的输出情况来看,很容易得到工作模式最主要的内容:消费者消费的消息都是不同的消息,消息并不会被重复消费。


发布订阅模式
生产者代码
public class Producer {

    public static void main(String[] args) throws IOException, TimeoutException {
        Channel channel = Common.getChannel();

        // TODO 声明交换机
        channel.exchangeDeclare(Constants.FANOUT_EXCHANGE, BuiltinExchangeType.FANOUT, true);

        // TODO 声明队列
        channel.queueDeclare(Constants.FANOUT_QUEUE1, true, false, false, null);
        channel.queueDeclare(Constants.FANOUT_QUEUE2, true, false, false, null);

        // TODO 绑定交换机和队列
        channel.queueBind(Constants.FANOUT_QUEUE1, Constants.FANOUT_EXCHANGE, "");
        channel.queueBind(Constants.FANOUT_QUEUE2, Constants.FANOUT_EXCHANGE, "");

        // TODO 发送消息
        String msg = "hello 发布订阅模式";
        channel.basicPublish(Constants.FANOUT_EXCHANGE, "", null, msg.getBytes());
        System.out.println("发布订阅模式发送消息成功!");

        // TODO 释放资源
        Common.close();
    }

}
当上述代码启动之后,在开源界面中发生了如下变化。队列列表中新增了两个队列,交换机列表中新增了一条声明的交换机。


消费者代码
public class Consumer1 {

    public static void main(String[] args) throws IOException, TimeoutException {
        Channel channel = Common.getChannel();

        // TODO 声明交换机
        channel.exchangeDeclare(Constants.FANOUT_EXCHANGE, BuiltinExchangeType.FANOUT, true);

        // TODO 声明队列
        channel.queueDeclare(Constants.FANOUT_QUEUE1, true, false, false, null);

        // TODO 绑定交换机和队列
        channel.queueBind(Constants.FANOUT_QUEUE1, Constants.FANOUT_EXCHANGE, "");

        // TODO 接收消息
        DefaultConsumer consumer = new DefaultConsumer(channel) {
            @Override
            public void handleDelivery(String consumerTag, Envelope envelope, AMQP.BasicProperties properties, byte[] body) throws IOException {
                System.out.println("消费者1接收到消息:" + new String(body));
            }
        };
        channel.basicConsume(Constants.FANOUT_QUEUE1, true, consumer);

        // TODO 释放资源
        Common.close();
    }

}
public class Consumer2 {
public static void main(String[] args) throws IOException, TimeoutException {
Channel channel = Common.getChannel();
// TODO 声明交换机
channel.exchangeDeclare(Constants.FANOUT_EXCHANGE, BuiltinExchangeType.FANOUT, true);
// TODO 声明队列
channel.queueDeclare(Constants.FANOUT_QUEUE2, true, false, false, null);
// TODO 绑定交换机和队列
channel.queueBind(Constants.FANOUT_QUEUE2, Constants.FANOUT_EXCHANGE, "");
// TODO 接收消息
DefaultConsumer consumer = new DefaultConsumer(channel) {
@Override
public void handleDelivery(String consumerTag, Envelope envelope, AMQP.BasicProperties properties, byte[] body) throws IOException {
System.out.println("消费者2接收到消息:" + new String(body));
}
};
channel.basicConsume(Constants.FANOUT_QUEUE2, true, consumer);
// TODO 释放资源
Common.close();
}
}路由模式
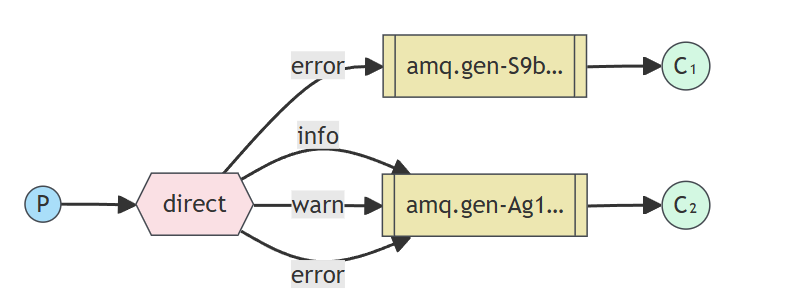
路由模式实现的代码案例按照此图的需求来做。根据此图可以看出,当生产者发送消息时的路由键为error时,两个队列都能收到消息;但是当生产者发送消息时的路由键为info或者warn时,只有队列二可以收到消息。
生产者代码
public class Producer {

    public static void main(String[] args) throws IOException, TimeoutException {
        Channel channel = Common.getChannel();

        // TODO 声明交换机
        channel.exchangeDeclare(Constants.DIRECT_EXCHANGE, BuiltinExchangeType.DIRECT, true);

        // TODO 声明队列
        channel.queueDeclare(Constants.DIRECT_QUEUE1, true, false, false, null);
        channel.queueDeclare(Constants.DIRECT_QUEUE2, true, false, false, null);

        // TODO 绑定交换机和队列
        channel.queueBind(Constants.DIRECT_QUEUE1, Constants.DIRECT_EXCHANGE, "error");
        channel.queueBind(Constants.DIRECT_QUEUE2, Constants.DIRECT_EXCHANGE, "info");
        channel.queueBind(Constants.DIRECT_QUEUE2, Constants.DIRECT_EXCHANGE, "warn");
        channel.queueBind(Constants.DIRECT_QUEUE2, Constants.DIRECT_EXCHANGE, "error");

        // TODO 发送消息
        // error的消息进入两个队列
        // info和warn只会进入队列2
        String[] msg = {"info", "error", "warn"};
        for (String s : msg) {
            channel.basicPublish(Constants.DIRECT_EXCHANGE, s, null, s.getBytes());
        }
        System.out.println("路由模式发送消息成功!");

        // TODO 释放资源
        Common.close();

    }

}
当运行上述代码之后,发现队列中的结果和预想结果一致。

消费者代码
public class Consumer1 {

    public static void main(String[] args) throws IOException, TimeoutException, InterruptedException {
        Channel channel = Common.getChannel();

        // TODO 声明交换机
        channel.exchangeDeclare(Constants.DIRECT_EXCHANGE, BuiltinExchangeType.DIRECT, true);

        // TODO 声明队列
        channel.queueDeclare(Constants.DIRECT_QUEUE1, true, false, false, null);

        // TODO 绑定交换机和队列
        channel.queueBind(Constants.DIRECT_QUEUE1, Constants.DIRECT_EXCHANGE, "error");

        // TODO 接收消息
        DefaultConsumer consumer = new DefaultConsumer(channel) {
            @Override
            public void handleDelivery(String consumerTag, Envelope envelope, AMQP.BasicProperties properties, byte[] body) throws IOException {
                System.out.println("消费者1接收到消息:" + new String(body));
            }
        };
        channel.basicConsume(Constants.DIRECT_QUEUE1, true, consumer);
        Thread.sleep(20000); // 阻塞等待消息接收完成

        // TODO 释放资源
        Common.close();
    }

}
public class Consumer2 {
public static void main(String[] args) throws IOException, TimeoutException, InterruptedException {
Channel channel = Common.getChannel();
// TODO 声明交换机
channel.exchangeDeclare(Constants.DIRECT_EXCHANGE, BuiltinExchangeType.DIRECT, true);
// TODO 声明队列
channel.queueDeclare(Constants.DIRECT_QUEUE2, true, false, false, null);
// TODO 绑定交换机和队列
channel.queueBind(Constants.DIRECT_QUEUE2, Constants. DIRECT_EXCHANGE, "error");
channel.queueBind(Constants.DIRECT_QUEUE2, Constants. DIRECT_EXCHANGE, "info");
channel.queueBind(Constants.DIRECT_QUEUE2, Constants. DIRECT_EXCHANGE, "warn");
// TODO 接收消息
DefaultConsumer consumer = new DefaultConsumer(channel) {
@Override
public void handleDelivery(String consumerTag, Envelope envelope, AMQP.BasicProperties properties, byte[] body) throws IOException {
System.out.println("消费者2接收到消息:" + new String(body));
}
};
channel.basicConsume(Constants.DIRECT_QUEUE2, true, consumer);
Thread.sleep(20000); // 阻塞等待消息接收完成
// TODO 释放资源
Common.close();
}
}上述代码启动之后,在控制台输出消息如下:


通配符模式
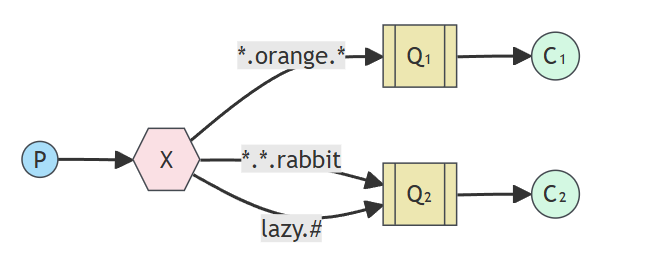
根据上述图片为需求来写代码。#表示可以一次匹配多个单词,*则表示一次只能匹配一个单词。
生产者代码
public class Producer {

    public static void main(String[] args) throws IOException, TimeoutException {
        // 获取信道
        Channel channel = Common.getChannel();

        // 声明交换机
        channel.exchangeDeclare(Constants.TOPIC_EXCHANGE, BuiltinExchangeType.TOPIC, true);

        // 声明队列
        channel.queueDeclare(Constants.TOPIC_QUEUE1, true, false, false, null);
        channel.queueDeclare(Constants.TOPIC_QUEUE2, true, false, false, null);

        // 绑定交换机和队列
        /**
         * #表示匹配一个或者多个词
         * *表示只能匹配一个词
         */
        channel.queueBind(Constants.TOPIC_QUEUE1, Constants.TOPIC_EXCHANGE, "*.orange.*");
        channel.queueBind(Constants.TOPIC_QUEUE2, Constants.TOPIC_EXCHANGE, "*.*.rabbit");
        channel.queueBind(Constants.TOPIC_QUEUE2, Constants.TOPIC_EXCHANGE, "lazy.#");

        // 发送消息
        /**
         * 根据匹配规则,第二个将不会匹配成功
         */
        String[] msg = new String[]{"a.orange.a", "a.b.orange.b.c", "c.c.rabbit", "lazy.a.b.v.c"};
        for (String s : msg) {
            channel.basicPublish(Constants.TOPIC_EXCHANGE, s, null, s.getBytes());
        }
        System.out.println("通配符模式消息发送成功!");

        // 释放资源
        channel.close();
    }

}
消费者代码
public class Consumer1 {

    public static void main(String[] args) throws IOException, TimeoutException {
        // 获取信道
        Channel channel = Common.getChannel();

        // 声明交换机
        channel.exchangeDeclare(Constants.TOPIC_EXCHANGE, BuiltinExchangeType.TOPIC, true);

        // 声明队列
        channel.queueDeclare(Constants.TOPIC_QUEUE1, true, false, false, null);

        // 绑定交换机和队列
        channel.queueBind(Constants.TOPIC_QUEUE1, Constants.TOPIC_EXCHANGE, "*.orange.*");

        // 消费消息
        DefaultConsumer consumer = new DefaultConsumer(channel) {
            @Override
            public void handleDelivery(String consumerTag, Envelope envelope, AMQP.BasicProperties properties, byte[] body) throws IOException {
                System.out.println(new String(body));
            }
        };
        channel.basicConsume(Constants.TOPIC_QUEUE1, true, consumer);

        // 释放资源
        channel.close();
    }

}
public class Consumer2 {
public static void main(String[] args) throws IOException, TimeoutException, InterruptedException {
// 获取信道
Channel channel = Common.getChannel();
// 声明交换机
channel.exchangeDeclare(Constants.TOPIC_EXCHANGE, BuiltinExchangeType.TOPIC, true);
// 声明队列
channel.queueDeclare(Constants.TOPIC_QUEUE2, true, false, false, null);
// 绑定交换机和队列
channel.queueBind(Constants.TOPIC_QUEUE2, Constants.TOPIC_EXCHANGE, "*.*.rabbit");
channel.queueBind(Constants.TOPIC_QUEUE2, Constants.TOPIC_EXCHANGE, "lazy.#");
// 消费消息
DefaultConsumer consumer = new DefaultConsumer(channel) {
@Override
public void handleDelivery(String consumerTag, Envelope envelope, AMQP.BasicProperties properties, byte[] body) throws IOException {
System.out.println(new String(body));
}
};
channel.basicConsume(Constants.TOPIC_QUEUE2, true, consumer);
Thread.sleep(2000);
// 释放资源
channel.close();
}
}下面分别为消费者1消费的内容和消费者2消费的内容:


RPC模式
客户端代码
public class Client {

    public static void main(String[] args) throws IOException, TimeoutException {
        // 获取信道
        Channel channel = Common.getChannel();

        // 声明队列
        channel.queueDeclare(Constants.RPC_REQUEST_QUEUE, true, false, false, null);
        channel.queueDeclare(Constants.RPC_RESPONSE_QUEUE, true, false, false, null);

        // 发送消息
        String uuid = UUID.randomUUID().toString().replace("-", "");
        AMQP.BasicProperties properties = new AMQP.BasicProperties().builder()
                .replyTo(Constants.RPC_RESPONSE_QUEUE) // 响应队列
                .correlationId(uuid) // 唯一id,用来确认接收的响应
                .build();
        String msg = "hello rpc";
        channel.basicPublish("", Constants.RPC_REQUEST_QUEUE, properties, msg.getBytes());

        // 接收响应
        DefaultConsumer consumer = new DefaultConsumer(channel) {
            @Override
            public void handleDelivery(String consumerTag, Envelope envelope, AMQP.BasicProperties properties, byte[] body) throws IOException {
                System.out.println("获取到的信息是:" + new String(body));
                System.out.println("发送的id和接收的id:" + uuid + '\t' + properties.getCorrelationId());
            }
        };
        channel.basicConsume(Constants.RPC_RESPONSE_QUEUE, true, consumer);

        // 释放资源

    }

}
服务器代码
public class Server {

    public static void main(String[] args) throws IOException, TimeoutException {
        // 获取信道
        Channel channel = Common.getChannel();

        // 声明队列
        channel.queueDeclare(Constants.RPC_REQUEST_QUEUE, true, false, false, null);

        // 接收消息
        DefaultConsumer consumer = new DefaultConsumer(channel) {
            @Override
            public void handleDelivery(String consumerTag, Envelope envelope, AMQP.BasicProperties properties, byte[] body) throws IOException {
                System.out.println("从客户端接收的消息为:" + new String(body));
                System.out.println("客户端要求响应的队列:" + properties.getReplyTo());
                // 处理客户端发送过来的消息并返回给客户端消息
                AMQP.BasicProperties basicProperties = new AMQP.BasicProperties().builder()
                        .correlationId(properties.getCorrelationId())
                        .build();
                String msg = "服务端返回消息";
                channel.basicPublish("", properties.getReplyTo(), basicProperties, msg.getBytes());
            }
        };
        channel.basicConsume(Constants.RPC_REQUEST_QUEUE, true, consumer);
    }

}
当两个程序都启动时,客户端和服务器输出的结果分别是:


SpringBoot工作模式代码案例
模板

<dependencies>
        <dependency>
            <groupId>org.springframework.boot</groupId>
            <artifactId>spring-boot-starter-amqp</artifactId>
        </dependency>
        <dependency>
            <groupId>org.springframework.boot</groupId>
            <artifactId>spring-boot-starter-web</artifactId>
        </dependency>

        <dependency>
            <groupId>org.projectlombok</groupId>
            <artifactId>lombok</artifactId>
            <optional>true</optional>
        </dependency>
        <dependency>
            <groupId>org.springframework.boot</groupId>
            <artifactId>spring-boot-starter-test</artifactId>
            <scope>test</scope>
        </dependency>
        <dependency>
            <groupId>org.springframework.amqp</groupId>
            <artifactId>spring-rabbit-test</artifactId>
            <scope>test</scope>
        </dependency>
    </dependencies>
spring:
rabbitmq:
host: 43.138.108.125
port: 5672
username: admin
password: admin
virtual-host: mq-springboot-test@Component
public class RabbitTemplateConfig {
@Bean
public RabbitTemplate rabbitTemplate(ConnectionFactory connectionFactory) {
return new RabbitTemplate(connectionFactory);
}
}工作队列模式
声明队列
@Configuration
public class WorkConfig {

    // 声明队列
    @Bean("workQueue")
    public Queue workQueue() {
        return QueueBuilder.durable(Constants.WORK_QUEUE).build();
    }

}
生产者代码
@RestController
@RequestMapping("/work")
public class WorkController {

    @Resource
    public RabbitTemplate rabbitTemplate;

    @RequestMapping
    public String workQueue() {
        this.rabbitTemplate.convertAndSend("", Constants.WORK_QUEUE, "hello work spring");
        return "成功";
    }

}
消费者代码
@Configuration
public class WorkListener {

    /**
     * @RabbitListener 是 Spring 框架中用于监听 RabbitMQ 队列的注解。
     * 通过这个注解,可以定义一个方法,以便从 RabbitMQ 队列中接收消息
     * 该注解支持多种参数类型,这些参数类型代表了从 RabbitMQ 接收到的消息和相关信息
     *
     * 常用的参数类型:
     * 1. String :返回消息的内容
     * 2. Message:SpringAMQP 的 Message 类,返回原始的消息体以及消息的属性,如果消息ID、内容和队列信息等等
     * 3. Channel:RabbitMQ 的通道对象,可以用于进行更高级的操作,如手动确认消息
     */
    @RabbitListener(queues = Constants.WORK_QUEUE)
    public void workListener1(String msg) {
        System.out.println("消费者1消费的代码:" + msg);
    }

    @RabbitListener(queues = Constants.WORK_QUEUE)
    public void workListener2(String msg) {
        System.out.println("消费者2消费的代码:" + msg);
    }

}
当生产者发送6条消息之后,消费者消费消息如下输出结果:

发布确认模式
声明队列、交换机、绑定关系
@Configuration
public class FanoutConfig {

    // 声明队列
    @Bean("fanoutQueue1")
    public Queue fanoutQueue1() {
        return QueueBuilder.durable(Constants.FANOUT_QUEUE1).build();
    }

    @Bean("fanoutQueue2")
    public Queue fanoutQueue2() {
        return QueueBuilder.durable(Constants.FANOUT_QUEUE2).build();
    }

    // 声明交换机
    @Bean("fanoutExchange")
    public Exchange fanoutExchange() {
        return ExchangeBuilder.fanoutExchange(Constants.FANOUT_EXCHANGE).durable(true).build();
    }

    // 声明绑定关系
    @Bean("fanoutQueueBind1")
    public Binding fanoutQueueBind1(@Qualifier("fanoutQueue1") Queue queue,
                                                  @Qualifier("fanoutExchange") FanoutExchange exchange) {
        return BindingBuilder.bind(queue).to(exchange);
    }

    @Bean("fanoutQueueBind2")
    public Binding fanoutQueueBind2(@Qualifier("fanoutQueue2") Queue queue,
                                                  @Qualifier("fanoutExchange") FanoutExchange exchange) {
        return BindingBuilder.bind(queue).to(exchange);
    }

}
生产者代码
@RestController
@RequestMapping("/fanout")
public class FanoutController {

    @Resource
    private RabbitTemplate rabbitTemplate;

    @RequestMapping
    public String fanoutQueue() {
        this.rabbitTemplate.convertAndSend(Constants.FANOUT_EXCHANGE, "", "hello fanout");
        return "成功";
    }

}
启动程序之后,使用127.0.0.1:8080/fanout发送一条消息,得到如下结果:

消费者代码
@Configuration
public class FanoutListener {

    @RabbitListener(queues = Constants.FANOUT_QUEUE1)
    public void fanoutListener1(String msg) {
        System.out.println("消费者1获取消息为:" + msg);
    }

    @RabbitListener(queues = Constants.FANOUT_QUEUE2)
    public void fanoutListener2(String msg) {
        System.out.println("消费者2获取消息为:" + msg);
    }

}
当生产者发送3条消息之后,消费者获取的消息内容如下:

路由模式
声明队列、交换机、绑定关系
@Configuration
public class DirectConfig {

    @Bean("directQueue1")
    public Queue directQueue1() {
        return QueueBuilder.durable(Constants.DIRECT_QUEUE1).build();
    }

    @Bean("directQueue2")
    public Queue directQueue2() {
        return QueueBuilder.durable(Constants.DIRECT_QUEUE2).build();
    }

    @Bean("directExchange")
    public Exchange directExchange() {
        return ExchangeBuilder.directExchange(Constants.DIRECT_EXCHANGE).durable(true).build();
    }

    @Bean("directQueueBind1")
    public Binding directQueueBind1(@Qualifier("directQueue1") Queue queue,
                                    @Qualifier("directExchange") DirectExchange exchange) {
        return BindingBuilder.bind(queue).to(exchange).with("error");
    }

    @Bean("directQueueBind2")
    public Binding directQueueBind2(@Qualifier("directQueue2") Queue queue,
                                    @Qualifier("directExchange") DirectExchange exchange) {
        return BindingBuilder.bind(queue).to(exchange).with("error");
    }

    @Bean("directQueueBind3")
    public Binding directQueueBind3(@Qualifier("directQueue2") Queue queue,
                                    @Qualifier("directExchange") DirectExchange exchange) {
        return BindingBuilder.bind(queue).to(exchange).with("info");
    }

    @Bean("directQueueBind4")
    public Binding directQueueBind4(@Qualifier("directQueue2") Queue queue,
                                    @Qualifier("directExchange") DirectExchange exchange) {
        return BindingBuilder.bind(queue).to(exchange).with("warn");
    }

}
生产者代码
@RestController
@RequestMapping("/direct")
public class DirectController {

    @Resource
    private RabbitTemplate rabbitTemplate;

    @RequestMapping
    public String directQueue() {
        String[] msg = new String[]{"error", "info", "warn"};
        for (String s : msg) {
            this.rabbitTemplate.convertAndSend(Constants.DIRECT_EXCHANGE, s, "hello direct " + s);
        }
        return "成功";
    }

}
消费者代码
@Configuration
public class DirectListener {

    @RabbitListener(queues = Constants.DIRECT_QUEUE1)
    public void directListener1(String msg) {
        System.out.println("消费者1获取到的消息:" + msg);
    }

    @RabbitListener(queues = Constants.DIRECT_QUEUE2)
    public void directListener2(String msg) {
        System.out.println("消费者2获取到的消息:" + msg);
    }

}
通配符模式
声明队列、交换机、绑定关系
@Configuration
public class TopicConfig {

    @Bean("topicQueue1")
    public Queue topicQueue1() {
        return QueueBuilder.durable(Constants.TOPIC_QUEUE1).build();
    }

    @Bean("topicQueue2")
    public Queue topicQueue2() {
        return QueueBuilder.durable(Constants.TOPIC_QUEUE2).build();
    }

    @Bean("topicExchange")
    public Exchange topicExchange() {
        return ExchangeBuilder.topicExchange(Constants.TOPIC_EXCHANGE).durable(true).build();
    }

    /**
     * *表示一个词
     * #表示多个词
     */

    @Bean("topicQueueBind1")
    public Binding topicQueueBind1(@Qualifier("topicQueue1") Queue queue,
                                   @Qualifier("topicExchange") TopicExchange exchange) {
        return BindingBuilder.bind(queue).to(exchange).with("*.orange.*");
    }

    @Bean("topicQueueBind2")
    public Binding topicQueueBind2(@Qualifier("topicQueue2") Queue queue,
                                   @Qualifier("topicExchange") TopicExchange exchange) {
        return BindingBuilder.bind(queue).to(exchange).with("*.*.rabbit");
    }

    @Bean("topicQueueBind3")
    public Binding topicQueueBind3(@Qualifier("topicQueue2") Queue queue,
                                   @Qualifier("topicExchange") TopicExchange exchange) {
        return BindingBuilder.bind(queue).to(exchange).with("lazy.#");
    }

}
生产者代码
@RestController
@RequestMapping("/topic")
public class TopicController {

    @Resource
    private RabbitTemplate rabbitTemplate;

    @RequestMapping
    public String topicQueue() {
        String[] msg = new String[]{"a.orange.a", "a.b.orange.b.c", "c.c.rabbit", "lazy.a.b.v.c"};
        for (String s : msg) {
            this.rabbitTemplate.convertAndSend(Constants.TOPIC_EXCHANGE, s, "hello topic" + s);
        }
        return "成功";
    }

}
消费者代码
@Configuration
public class TopicListener {

    @RabbitListener(queues = Constants.TOPIC_QUEUE1)
    public void topicListener1(String msg) {
        System.out.println("消费者1获取到的消息" + msg);
    }

    @RabbitListener(queues = Constants.TOPIC_QUEUE2)
    public void topicListener2(String msg) {
        System.out.println("消费者2获取到的消息" + msg);
    }

}
该篇文章中,对MQ的常用工作模式以及对应RabbitMQ的SDK示例和SpringBoot示例进行了简单表示。接下来就进入对RabbitMQ一些特性的文章上。

![[SAP ABAP] 修改内表数据](https://i-blog.csdnimg.cn/direct/88f35c63227741359ab6509838d61265.png)